How to Paint a Fence?
Fences are not just things that make boundaries; they also sprinkle some spice in your house with privacy and security for your property. A good fence, painted and maintained well can enhance the way your outdoor area looks. It can be welcoming and make itself very pleasing to the eye. Painting a fence is not only about its visual aspects. It also keeps the wood from rotting as well as weather damage. Restoring an old fence or painting a new paint in it would mean taking time and following a very detailed and systematic approach so that it causes a professional-looking, long-lasting result.
This guide walks you through everything you need to know about painting a fence, from preparation to the final coat. Let’s dive in!
Why Paint Your Fence?
To paint your fence is not just for a fantastic aesthetic but is certainly a wise investment directly related to its longevity and appearance. Among the great advantages of painting a fence is that it brings durability. The paint is a protection against moisture which leads to swelling and, ultimately, decay in the wooden structures. Not only does the paint act as a barrier against moisture, but it also protects the wooden fence from the sun’s rays; UV rays lead to fading and cracking with the passage of time. It also plays a major part as a barricade against wood-destroying insects such as termites, protecting the fence from internal damage.
An attractive hand-painted fence enhances the visual aspect of your overall outdoor space. Choosing colors that go with the home and garden will make the environment complementary and pleasing to the eye, maximizing curb appeal. Beyond aesthetics, painting has an important function in damage prevention. By sealing the wood surface, it strengthens the defenses against cracking, warping, and decay as exposed to the elements, thereby prolonging the life of the fence.
Lastly, a painted fence makes maintenance simple. Because the smooth, sealed surface prevents dirt and grime, it’s easy to clean whenever it gets freshened up throughout the year. Paint features those qualities that make it worth painting a fence: beauty and long-lasting protection. Thus, making paint worthwhile for homeowners, who want to use their fences not only for performing functions but also for style.
Step 1: Prepare the Area
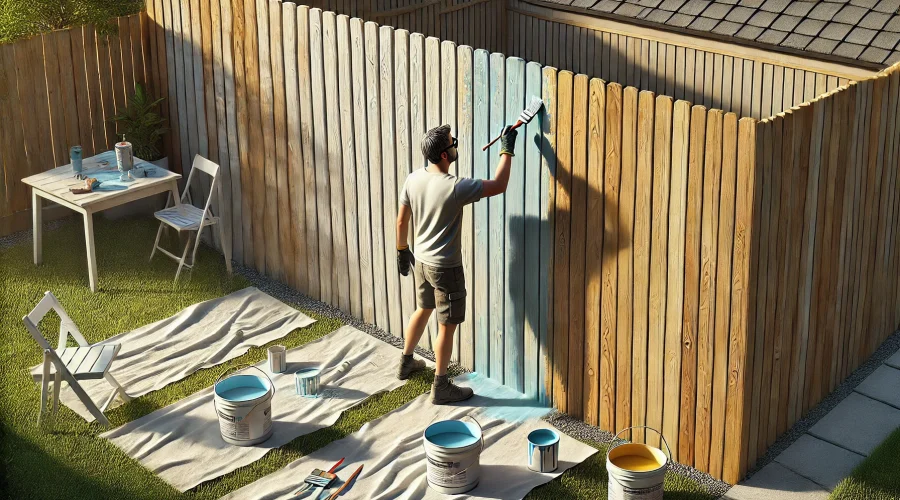
Before starting the painting, it is necessary to prepare the area around so that the place does not get damaged and the operation is carried out smoothly.
- Space will be Cleared: Any plant, garden furniture, and decorations near the fence will be cleared so that the paint place can be reached easily without accidentally splattering paint anywhere.
- Protect Nearby Surfaces: Bring up some canvas or plastic sheets and drop cloth to cover the ground and other nearby items.
Make sure you take those measures for setting up a clean working area and minimizing cleanup chores afterward.
Step 2: Inspect and Repair the Fence
Inspect your fence thoroughly before picking up a paintbrush.
- Damage Check: Look for all loose boards, cracks, rots, and protruding nails.
- Repairs: Tighten screws, replace damaged panels, and fix any structural issues.
- Treat Rot: In case you see a sign of rotting, treat it with a wood preservative to avoid any further deterioration.
Early attendance to these issues gives an easy and smooth paint job and an excellent finish.
Step 3: Clean the Fence
A clean surface is critical for proper paint adhesion. Here’s how to do it:
- Pressure Washing: The use of pressure washers helps to eliminate grime and dirt, as well as old paint. However, extreme care must be taken while pressurizing so that wood does not get damaged.
- Scrubbing: Without the pressure wash, if one would rather scrub clean a fence, go for a soap and water solution along with a stiff-bristle brush. The scrubbing finishes with rinsing to remove all residues completely.
- Drying: Next, the complete fence needs to be left to dry entirely before proceeding with the next step, this normally takes about 24-48 hours depending on conditions outside.
Step 4: Sand the Surface
It creates a surface that smooths paint adhesion and effectively soothes the final coating.
- Light Sanding: Use medium-grit sandpaper to sand down the whole fence while concentrating on all the rough or uneven areas.
- Remove Dust: After the sanding, the fence should be wiped down with a damp cloth or blown clean with a leaf blower.
Step 5: Apply Primer (Optional)
Primer acts as a base coat, improving paint adhesion and durability.
- Apply Primer: Apply primer to a new fence, for exposed bare wood surfaces, or when changing to a paint color significantly different from the existing one.
- Selecting a Primer: Use a primer that is designed specifically for exterior wood surfaces.
- Application: Brush or roller apply a thin even coat of primer. Allow it to dry completely prior to painting. Use special primers made for that purpose when it comes to wood for exterior purposes.
Step 6: Choose the Right Paint
Selecting the right type of paint is crucial for a long-lasting finish.
- Outdoor Specific Paint: The paint has been in dedicated use outside since it is made according to the speculations for being weather-resistant.
- Color Coordination and Finish: Choose the best color most suited for your practical home and a preferred finish such as matte, satin, or glossy.
- Water-Based or Oil: Water-based paints may be environment-safe and dry fast but do not come up even close to oil-based paints for durability.
Step 7: Painting the Fence
Now that the fence has been painted and the selection of color is done, the whole painting process will commence. Paint application is heavily influenced by choosing the right painting tools. A brush applies best to the detailed areas, corners, and edges, where it can suit closed areas. Little flat surface areas attached to bigger areas can use a roller, while any painting work requiring a smooth, even effect can be done best by a paint sprayer, although the technique can take some practice to keep from over-spraying.
Start with the application of the first coat from the top of the fence to prevent any possible drips and work downwards. Apply the paint in a thin, even layer, covering all areas uniformly. After applying the first coat, allow it to dry properly, according to the manufacturer’s suggested drying time. If necessary, apply a second coat to create an even, protective finish that gives the fence extra durability and attractiveness.
Step 8: Important Considerations
To achieve the best results, keep the following in mind:
- Weather Conditions: Select a pleasant, dry day for doing the painting outside. Avoid being painted with direct sunshine, high humidity, or windy conditions.
- Protective Gear: Wear gloves and goggles together with some old clothes to paint, safeguarding from splashes.
- Ventilation: When employing a sprayer, have ventilation to avoid inhaling fumes.
Step 9: Maintenance Tips
It is important to maintain your painted fence regularly to keep it fresh and sturdy over time. Start with regular inspections to look for damaged, chipped paint, cracks, holes, and so on. If you tend to these issues right away, they won’t worsen and make your fence last for a longer period. And of course, you will need to wash it from time to time, washing the fence with water and mild soap helps remove dirt, mildew, and grime from the environment that collects on the pretty fence and dulls its appearance.
Moreover, repainting once every few years, or as required, keeps the protective barrier intact and wards wood away from moisture, UV rays, and other detrimental elements. This is the way to keep your painted fence looking good for many years to come.
A fence painting project can be a novel DIY experience about enhancing the curb appeal of your property and the protection it affords against the elements. Follow the steps in this guide, and you can get a finish that looks professional and will be there for many years. Success depends on proper preparation, the right tools, and attention to detail. Contact our expert team for maintenance or improvement on your fence. We offer top fairfield fence company including specialized solutions to meet your individual needs. Call us today to make sure your fence is as nice as required mixed with the fact that it is indeed a fence built to last.
Happy painting!


